Seven of Nine
Tertiary Adjunct to Unimatrix Zero-One
(from Star Trek Voyager)
(Halloween 2001)

 Yes, I too hated Seven of Nine at first, knowing that especially her
outfit was designed to make the male 18-34 demographic drool, but
I think she developed into the most interesting character on Voyager. She
fulfilled the essential Trek character type of the outsider view on
humanity that was originally intended to be the Doctor's role, but that
had not succeeded as well as Spock or Data had. Seven ranks a close third
in that role in my opinion, in front of Odo or the Doctor. So, if you
come to appreciate Seven's character, you can explain that a form-fitting
jumpsuit actually is a very efficient oufit as far as range of mobility
and lack of frivolous fashion embellishments. Well, the carapace does
make it difficult to bend at the waist, but that is still required Borg
technology she cannot avoid, just as the hand glove, the optical
implant and internal nanoprobes are. Without the Borg carapace, her
intestines might just fall out all over the bridge one day! ;-)
Yes, I too hated Seven of Nine at first, knowing that especially her
outfit was designed to make the male 18-34 demographic drool, but
I think she developed into the most interesting character on Voyager. She
fulfilled the essential Trek character type of the outsider view on
humanity that was originally intended to be the Doctor's role, but that
had not succeeded as well as Spock or Data had. Seven ranks a close third
in that role in my opinion, in front of Odo or the Doctor. So, if you
come to appreciate Seven's character, you can explain that a form-fitting
jumpsuit actually is a very efficient oufit as far as range of mobility
and lack of frivolous fashion embellishments. Well, the carapace does
make it difficult to bend at the waist, but that is still required Borg
technology she cannot avoid, just as the hand glove, the optical
implant and internal nanoprobes are. Without the Borg carapace, her
intestines might just fall out all over the bridge one day! ;-)
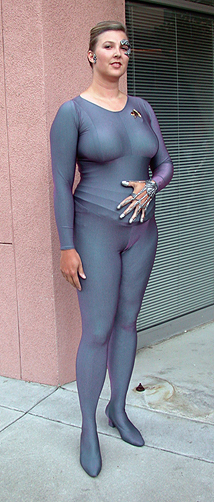
I had toyed with the idea of being Seven of Nine for my 2001: A Space/Time
Odyssey scifi costume birthday party, but I chickened out on the
form-fitting spandex jumpsuit because of the Central Valley summer heat,
plus since I will never be as skinny as Jeri Ryan, I wasn't sure I would look okay, even with a corset involved. After my birthday, I was doing more brainstorming for Halloween costumes with a friend, and he came up with Seven of Nine as a possibility for me on his own, so since that implied I could pull off the look, I decided to go for it!
Hair:
I have a french twist comb that makes this hairstyle very easy, or
otherwise just do your own french twist with bobby pins. I didn't feel
like bleaching my hair, so I left it as my normal dishwater blonde.
Makeup:
My makeup aside from the Borg appliances is very plain - just basic
foundation, minimal eye makeup, and a natural color lipstick & blush. Be
careful not to put any foundation or blush where you will glue your
appliances!
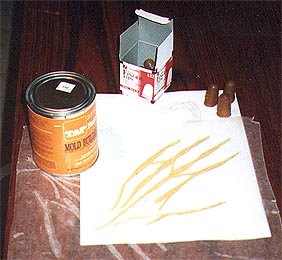
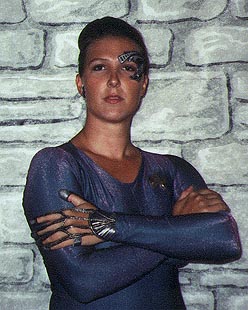
Borg appliances:
After many, many freeze-frames of various Voyager episodes on pause on my
VCR, I had drawn good life-size replicas of the eyepiece, earpiece, and
hand glove. I made Sculpey originals of the facial pieces, then made
Sculpey molds of them. I bought a can of liquid latex from TAP Plastics,
built up the Sculpey molds with layers and layers of liquid latex, and
painted the latex on the wax paper sheet over my drawing of the hand
glove. Since the glove is basically cable strands intertwining, but I
wanted the whole piece to have as much stability as possible, I painted
the layers instead of intertwining individual strands. Once the layer was
thick enough, I started building up only what were the individual strands,
leaving the original thickness as the well between them. You need to
be patient for all these layers of latex, since adding a new layer when
the underneath is not yet dry will only take longer for the entire piece
to dry, so there is no benefit to rushing. I added a new layer every day
for a couple weeks before I was finished with all the latex on my pieces.
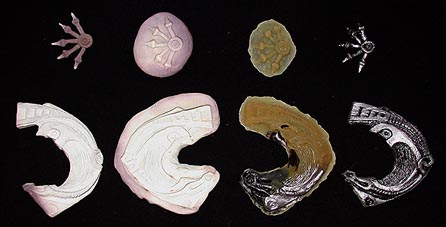 After removing the facial pieces from their molds, I made sure they fully
cured for another day, then painted them with black fabric paint so the
paint would still be able to move when the appliance moved without
cracking. Once the black was thoroughly dry, I used silver leafing paint
over the black, leaving the crevices black. I did not paint the side of
the piece that would be touching my skin.
After removing the facial pieces from their molds, I made sure they fully
cured for another day, then painted them with black fabric paint so the
paint would still be able to move when the appliance moved without
cracking. Once the black was thoroughly dry, I used silver leafing paint
over the black, leaving the crevices black. I did not paint the side of
the piece that would be touching my skin.
I had purchased a black rubber glove (well, yeah, I bought a pair, but I
only needed the one!) to use as the base for the hand glove, so once the
latex strands were done, I trimmed the glove to fit the strands, leaving a
strip across the palm for stability. (This palm strip is authentic, but
it's really hard to find a shot of it in an episode! In all my searching,
I think I only found one really quick shot of it, so I left it plain
black.) Also for stability, I left the wrist long at this point, but I
slit the inner wrist so I could get the glove on & off without stretching
& popping the glued latex pieces off the glove.
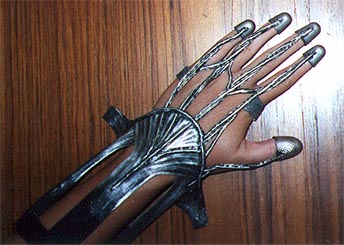
Since the glove fingertips were not a good enough fit, I found rubber
fingertips used for paper filing at Office Depot. The tips are meant to
be worn with the spiky side out for a better grip, but I turned them
inside out so the smooth side showed. I tried dyeing these with black RIT
dye, and it worked! The liquid latex repels the dye, which is why I had to
use fabric paint on the other appliances. KrazyGlue works great on latex
and plastic, so that's what I used to glue the latex strands onto the
fingertips. My thumb was too large for the rubber fingertips, so I
made my own thumbtip with liquid latex over a resized thumb from the
black glove to be sure of a tight fit. After the entire glove was glued
together and painted black with fabric paint on any remaining surfaces, I
then used the same silver leafing paint over everything, leaving the
crevices black. I also dry-brushed the silver on the wrist to approximate
more individual strands.
I used spirit gum to adhere all the appliances to both my face and hand.
It worked excellently on my hand and ear piece, but I think the eye piece
is just in a bad spot both gravity-wise and perspiration-wise, since
spirit gum starts to lose its stickiness in contact with sweat, so I had
some problems keeping the eyepiece on. Perhaps next time I will find the
medical adhesive that requires its own solvent, which can be found at
specialty costume and makeup shops.
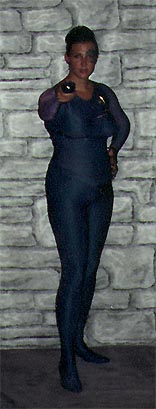
Borg Carapace (corset with Borg "bones"):
(a carapace is a turtle's or crustacean's protective covering)
For the Saloon Girl costume, I had purchased a Laughing Moon Mercantile
authentic Victorian corset pattern, and for that I made the plain,
non-gored corset in black satin, which gave a perfect Victorian look, but
alas, that flattened out my natural curves that needed to be enhanced to
be Seven. So, I took the gored version, added hip gores, which allows the
corset to be cinched much tighter at the waist. Both of those corsets
require steel boning, which I purchased in Berkeley at Lacis - a great
store! Also, since authentic corsets are meant support the breasts in a
certain way that did not match Seven's shape, I made my corset fit just
under my bustline, which gave support akin to an underwire bra but with
a natural shape. Once the corset was finished, I used thick drapery
cording tacked onto the corset to make the Borg "bones" in the proper
horizontally-curved pattern. This way, the "bones" are temporary so the
corset can be used separately.
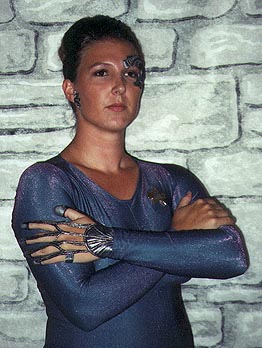
Jumpsuit (and Shoes!):
I looked around for a usable pattern, even just to start with, but I
didn't find anything really useful. Since I had purchased 5 yards of the
"dance/skate" Spandex to be sure I had plenty, I just measured around
myself while wearing the corset for the basic pieces, and pinned where
necessary once the pieces were cut & assembled. Of course, I did not pin
everywhere all at once, since this does need to be pieced together.
For details I chose Seven's more "normal" daily jumpsuit rather than her
original silver one, but both were quite similar, so I was able to see
certain seams in one photo I was unable to make out in another. By
closely examining various online photos, I noticed that there was a
vertical seam for the shaping around each breast instead of darts, and
there was a separate piece around the waist that matched the seam of
the corset that helped to hide the fact it was actually a corset
undeneath. This also meant that the leg pieces went all the way up to the
lower corset seam, and that the leg seams were on the inside of each leg.

Once I had the approximate shape of each piece by measuring, I started
assembling and pinning. The other problem with Spandex is that to get the
proper stretch, you really need a real seam vs. just pins, so there was a
lot of wasted fabric from a previously-stiched seam being cut away after
it was taken in yet again. The stretching issue also means you need your
zipper in towards the beginning of the project, then adjust all other
seams, not the zipper seam. I pinned first, then stitched, then adjusted
again after trying the piece on, then if it was symmetrical like an arm or
leg, I used that final seam as a starting point for the other side.
I saved the shoes for last by leaving the bottom of each leg open with
plenty of fabric to play with. I could not find the exact shoes with a
stacked wood heel, so I used some plain black pumps I had that were about
the right heel height and standard pointed closed-toe shape. I put on the
jumpsuit, put on the shoes, then went mad with more pinning, and in the
end, I was very happy with the results for the shoes! They look perfectly
built-in to the jumpsuit!
2003 Reprise:
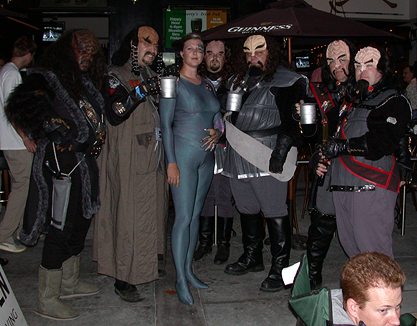
In the summer of 2003, Cinequest San Jose ran a costume contest with a free showing of the documentary "Trekkies" one Wednesday evening, so of all the Trek costumes I have, I thought Seven had the chance of getting the most audience votes, since they were most likely a male majority that would appreciate Spandex for its own sake. ;) Well, by audience applause it was down to the big furry Klingon and me, and even he thought I won, so he got the $75 check, but I got a t-shirt, Trader Joe's canvas bag & two bottles of decent wine, so not too bad! Of course all the Klingons wanted their photo with me, and I with them. I even had someone ask to take a photo of me with their cameraphone...heh!
Copyright ©1996-2008 Britta Blvd. All rights reserved. All text, photos, graphics, artwork and other original material on Britta Blvd
are copyrighted and may not be published, broadcast, rewritten or redistributed without prior written consent.